Monday 17 January 2022

Kate and Judith are swopping stitch clubs; requirement for photo/fabric collage

Kate will now be Feb 19th with photo and fabric collage

Judith will be March 19th with chicken scratch

Please let Kate know if you plan to come along in Feb katesteane@gmail.com


detail

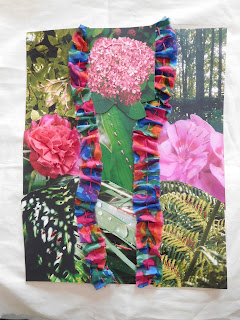
Photo and fabric collage in Feb - things you can bring along

Photos – prints, images from magazines, think about colour. Do not bring anything you will regret cutting up (I will have more than enough photos for everyone).

Fabric – think about the colour of your images and fabric that will merge, contrast or otherwise work with them (if you use my photos then you would be safe to go for greens). Think about the density of your fabric – do you want to use shears or nets where images can be seen through them or do you want dense fabric, shiny fabric and so on.

Cotton embroidery threads – it is much better to secure the images with a few stitches as glue is often rather temporary. The stitches themselves can add to the image. Again colour is important for thread – blend or contrast.

Backing fabric – this needs to be tough, perhaps calico or even furnishing fabric. It does not matter what the image is as you will be covering this up (unless you don’t want to). This fabric will hold the whole thing together – so perhaps A3 size; you will need to glue onto and stitch into this.

  • Paper scissors
  • Fabric scissors
  • Glue stick


Kate will bring

  • Her iron and towel
  • A selection of translucent and transparent fabrics
  • A small number of other fabrics
  • A large collection of flower photos and green photos to work with if you want.


Sunday 16 January 2022

Snood making in process with Robyn Smith along with detailed instructions 15th Jan 2022

 We had a marvellous day making felt snoods.


1.       Lay your bubble wrap bubbles up on an old towel

2.       Lay your resist on top of the bubble wrap with the longer edge in-line with you.

3.    3.   Lay a fine layer of silk or viscose fibres on the resist, lay them horizontally keeping them two inches in from the long edge of the resist and you can overhang slightly on the shorter edge.

4.   4.    Lay your first layer of wool (lay fine) in the same direction to the as the silk/viscose fibres, try and keep it fine and even.

5.   5.    Lay your second layer this time vertically (in the opposite direction to the layer below) and put any embellishments on top.

6. Place your net over the top or your wool, wet down with your warm soapy water, also running your bar of soap over the fibres to make sure they are completely wet

7.       Keep the net on and turn over the whole piece with the resist in place.

8.       Lay your layer of silk/viscose as on the other side and your first layer of wool.

9.       Fold in the edges from the first side that have over hung.

10.       Now lay down your second layer of wool horizontally and any embellishments as on the previous side.

5.     11 Place the second piece of net on, wet down as done previously. This time once it is all wet and soapy spend 10-15 rubbing the fibres gently all over, make sure you work along the folded edge so it doesn’t move and cause a seam. You can check if the fibres are starting to felt by pinching the wool and looking if they are starting to attach, if the have then you can turn the piece over and repeat this process on the other-side, if not then rub for longer to make sure the fibres are starting to adhere. Its worth spending time on this stage as you don’t want the fibres to move in the next stage.

12.       Remove the net

7.       13 Next fold the edge of the bubble wrap to the edge of your felt and roll the bubble wrap up into a sausage shape. Gently roll the wrap backwards and forwards about 40 times, open the roll back up, turn your felt piece over and turn it around 90` and roll up again, repeat this until you have rolled the felt from each direction. Go through this process again so about 360 rolls in total then open up and remove the resist.

8.      14 Carry on rolling the scarf up in the bubble wrap and rolling but make sure in between each set of rolls you run your hands between the layers of scarf as they will want to try and felt together. Keep going until the scarf has stopped shrinking, rinse out the soapy water and leave to dry.


Andrea has cut her snood up to make four fabulous book covers.


Tuesday 11 January 2022

Requirements - or rather bring if you can for Snood creation with Robyn Smith on Saturday

 Requirements:


Resist material- a thick plastic approx 50cm square
Large piece of bubble wrap
Merino wool
Silk fibres or embellishments
Silk fabric if you want to do a bit of nuno felting
Towel.
Plastic bag to take wet felting home in
I’ll bring soap and fairy bottles for water


I will bring all of these with me plus the drum carder so don’t worry if you haven’t got any of the requirements.
For all the materials it will be about £5 or less if you just use some of my stock.
Any questions please get in touch.
See you Saturday
Robyn x

Sunday 9 January 2022

The next three stitch clubs at Heighington Jan to March 2022

15th Jan Robyn Smith Felting a Snood

Felting A Snood

Robyn will be bringing fleece and her mixing machine

A snood is a neck warmer - we will be making a felted tube to pull over the head to settle round the neck.

No need to bring anything but yourselves


19th Feb  this will now be Kate Steane Photos and Fabric - collage

19th March Judith Snaith Chicken Scratch on Gingham